Thursday, May 24, 2018

Have a Drink

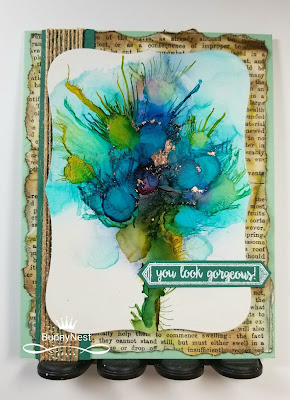
Welcome back! Today I'm sharing a video and project designed to make your playtime fun. It seems alcohol inks have been all the rage lately. I've never put mine away for long. They are just so organic, random, ever-changing, and plain old fun. Add some Yupo paper, and you have magic!

I'm hosting the Mix-Ability challenge over on Splitcoast Stampers this week. Our little team are dedicated to making artistic mediums approachable for card makers and art journalers alike! This week I'm challenging you to use alcohol inks to create a flower. Here's the video.


These are the three flowers I created. I've turned one into a card, one into an art journal, and the other is waiting for another application.


It's a pretty basic card, but I wanted the flower to take center stage. This flower was completed on SU! glossy cardstock. It didn't move the way alcohol ink does on Yupo, but it's still pretty. The faint blue areas on the paper were deposited residual ink drops.


This is the flower from the video. Isn't it wonderful? All the motion, the color, your eye fills in the gaps and viola! It's a pansy lily! Plily? Panly? Linsy? Hmm...

You were born an original. Don't die a copy.

All that yummy goodness! There were a million steps to this, but basically this is how it happened...


I started with a titanium buff acrylic paint, then adhered the Yupo flower panel with torn text paper glued around it. I find it fascinating that God would pick that little bit of all the papers I have (I just pull it out, I don't look at it) that says Santa Fe. That high school was the site of the recent school shooting. Intriguing since I picked the page statement out long before this concept came together. He leaves His fingerprints all around if we're willing to look for them.


I added layers of acrylic ink over Golden crackle paste spread through Dylusions and SU! stencils. I cut each word out of 37 different alpha dies...actually just 3 - 2 old QuicKutz dies and the other from Mama Elephant. The sticker words came from a Tim Holtz pack. I sealed it all up and added shading, black and white paint splatters, and Tonic Nuvo Crystal Drops in places to lead the eye.


And this little gem will find its way onto something soon. I could make these flowers forever. I hope you'll try this technique - and have fun doing it!

Ta for now,

~ky

Wednesday, May 23, 2018

Pretty and Polished

Hey friends! I'm back with a new tutorial on Splitcoast Stampers (SCS). This time, I'm cleaning out some of my beauty supplies. Can you guess?

Fingernail polish! Yes! I have some issues with nail polish, so I rarely wear it. I have some bottles that have been lonely in a dark closet. But the colors are so pretty, and the glitter is in a form I can live with - bunnehs do not look good in glitter!

So I created a new technique using nail polish, water, a stir stick, and plain cardstock. We've named this Nail Polish Marbling. Here are some finished panels awaiting turning into projects.


I also made you a little video to show you how I made these. I want to thank SCS for allowing me to share this technique - so please hop on over to the technique page and gallery. I'd be extra happy, like a chicken with a June bug, if you tried the technique and shared your work!


Here are my 2 finished projects. If these strong colored panels are frightening to you, just treat them like monsters and cut them up! Cut strips, paper piece, use your dies - when you do any of these actions, that paper can cover a full set of cards.

Beautiful You paper-pieced dress.


Hero Arts "smile" and SU! striped scallop die

Now, go play and have fun! It's only paper!

Ta for now,
~ky


Friday, May 18, 2018

MISTI Fingerpainting

Have you ever attended a crafty event or retreat? They are so much fun and you learn a lot. Sometimes you learn from a presenter, or maybe someone at your table shows you something. That's what happened to me.

I went to the Fabulous Lydia Fiedler's retreat one time. She had tons of things to share with us, and fellow guests were all so willing to share their experiences and help each other. You should go. You should. Her events sell out fast, so your fingers have to be quick. You can stalk her blog - Understand Blue.

This one time, she taught us how to use a MISTI to create a marbled cityscape using the MISTI. You can see her tutorial here. I'll be doing something similar, but with my little twist.

I needed some upscale masculine cards for a friend. Something to convey they were appreciated as teacher and principal. I went with the Rooted In Nature set because I love those bold images (you can order it June 1st, so start your list!! Be sure to add the matching paper and dies - you'll want them ALL!), and trees always remind me that great oaks grow from acorns. It's a bit acorny, but teachers are all about growing strong, capable people.


I created the faux metallic effect on regular cardstock by using the 3D dynamic embossing folder honeycomb, covering the entire piece in versamark, and applying many layers of metallic pan pastels (would you like a video on that?).

I used Canson watercolor paper instead of smooth cardstock to give more texture to the tree. I used a retired ink color, but you could sub any similar combo based on what you have. Mine were Tangelo Twist (ret.), Crushed Curry, Mossy Meadow, and Early Espresso.

While that was drying, I pressed SU! white embossing paste through the pattern party mask over selected parts of the card base. I second- and third-generation stamped some of the skeleton leaves in the unembossed areas.

The new Stampin' Up! dies have a new feature - some of them just emboss! I embossed the copper foil paper then used the die to cut it. Love that effect! I also added some circled metallic thread behind the image just to add more dimension.

I'm so glad you visited my blog today. If you have any questions or comments, please let me know. You're the best!!

Ta for now,
~ky


Sunday, May 6, 2018

Butterflies Need Not Apply

I was kind of bummed out when I searched and discovered the Bible doesn't mention butterflies. Well, there's that worm that ate Jonah's shade, but we have no mention that it was a butterfly caterpillar. I wondered about this for a few days. It kind of rolled around in my head, occasionally banging into whatever I was doing at the moment. A spoiled child with few manners. God uses stuff like that.

I decided to see if He would show me something about my disappointment. If you ask God to show you something, hang on tight! Being a biologist, the lives of butterflies were mesmerizing. I got the chance to work with some really important butterflies during the course of my career. I learned a lot about their likes and dislikes, how they don't get mad when the wind blows them around, and about how they provide for the next generation.


Most butterflies live less that a year, many less than several months. Somehow, they have to tell the next generation how to butterfly without actually being around them. God codes their genetic material for that, but it's no less stellar.

A lot of butterflies lay their eggs in the leaf litter or at the base of their primary host plant. The eggs are often no larger than the tip of a ball-point pen. Then the parents die, the egg overwinters, then hatches to consume the plants in early spring. Don't use pesticide on those spring weeds. Please.


After a good bit of chewing, they find a good spot, plant their last pair of legs and spin their chrysalis, and settle down to await what comes next. Then they turn to liquid. Yes. Completely. Liquefaction. They secrete enzymes that devour their entire body. Imagine. Caterpillar soup. Yum...(ew).


Could you trust that process? It's a good thing that only happens to them. Or does it? I was chasing butterflies, but here's the reason why. It happens to us too, and God fully intended it that way. We must completely die to self. We must await the new, tender heart He places in our souls. Can you relate to the caterpillar? At that stage of belief, we really don't understand it. Many people back out too early. Others make a snap decision that if it didn't happen fast, they didn't need to stick around to figure it out.

----- HE TRANSFORMS US -----

Yes. Transforms. That is exactly what happens to the caterpillars. They leave their chrysalis, pump up their brand new wings, and take off to where their genes lead them. For them, it's intuitive. For us, it takes a little longer because we are so stubborn. Ever met a stubborn butterfly? Yeah, me either. 


When God showed me all of this, I had to capture that butterfly. I had to get it in the Bible. And I'll never be the same. We are fearfully and wonderfully made, and God does a great work in us. Romans 12:2. Have a good day.

Ta for now,
~ky

Methods and products:
After sealing my page with Finnabair art basics clear gesso, I heat embossed the fern leaf with clear powder. I stamped and second generation stamped the leaf (Retired Butterfly Basics, SU!) over the embossed areas, then color blended the background with the same inks. The butterfly base was cut out of watercolor paper and edge-blended with Distress Inks - the center of the butterfly is left plain to get that color pop. The delicate wings were cut from Early Espresso SU! cardstock. I added the enamel dots and Nuvo drops, spattered the page with watered down Distress Ink and wet mica powder. I sealed it with matte mod podge spray.

Saturday, May 5, 2018

Fighting Fish

Hello! Welcome back to my little blog. I've got a simple project for you today. I was recently introduced to stamps by The Ton. Of course I had to have a lovely set perfect for my MISTI addiction. I was so excited that I made a mistake in the order, but the owner, Effie Cho, was quick to get it corrected for me! I cannot love great customer service more!


Aren't these Beautiful Bettas absolutely gorgeous?? And they have matching dies. This set is incredible. I can't wait to make a color combo swatch with them to choose fin fashions! Until then, I jumped right into the fish bowl!


A gorgeous betta deserves beautiful water to make his colors leap from the page. I used Yupo paper, 4 colors of Adirondack alcohol ink, some alcohol blending solution, and a can of compressed air. I used the compressed air to move the inks into one another, letting them pool and dry however they would. I love the hard edges - it's just my thing. Before the ink is completely dry, it is very sticky. I pressed bits of Nuvo sunkissed copper gilding flakes, popping them on different spots and rubbing off what wouldn't stick. Isn't this gorgeous on it's own?

Well. It can't stay pretty just looking at me. It had to become something I could share with others. I die cut this piece (sob!) with a large Spellbinder's circle die. 

My tears were still drying, so I turned to the betta to distract myself with something beautiful. I wasn't even sad for the Yupo after this. These layering stamps are so easy to line up. I put them in my MISTI to get them just perfect.


I used Mustard Seed, Orange Marmalade, Barn Door, and Aged Mahogany Distress Inks to get this beauty. On the first layer - the large solid fish, I tapped on Marmalade with my finger, then added Mustard Seed in the same way. The second layer was Barn Door which I double-stamped. I love the mix! It's a color riot! Then the Aged Mahogany pulled it all together. 


He is so handsome!! I added two bits of sea grass to hang out with him. The sentiment is white embossed on black cardstock with a little Glittered Enamel Dot perfectly matching the grass. How happy that makes me! I also added Morning Dew Nuvo Crystal Drops in a couple of places.


I added it to a Whisper White base embossed with a Sizzix folder. What do you think? I think I'm in love!!

Thanks for stopping by today - it's nice to see you! Please feel free to leave a comment, I always love hearing from you.

Ta for now!
~ky
Welcome to the Bunny Nest! I host rescued animals in a small in-home setting. Currently, I host 3 bunnies and 2 kitties. These animals will be socialized and housed for the entirety of their lives in my home. They inspire my crafts, and I use any proceeds to pay for their needs. Thanks for visiting!