The summer session of Craft and Hobby Association has come to an end (the industry side, that is). I'm always a little sad about that, but energized at the same time. I know new products are coming our way! It is my heartfelt prayer that everyone has safe travels home.
Everyone knows the heat is a big issue right now, and we've been struggling to keep cool. The kitties haven't had a romp in a week, I'm 5 days since my last phys-therapy, and the bunnies don't even want to move. We've all been huddled in the ArtLab hiding from the sun. Here's a glimpse of what I've been doing. As always, you can click on the images to see a closer view.
I colored a whole set of this beautiful anime faerie with copic markers, so I have a stash to just pull out and play with. I also used Sakura gelly roll star pens on her wings. Now, this isn't a problem unless these images are on cards heading to Operation Write Home (where 99% of my cards go). Yes, tiny bits of glitter will rub off on your finger, so they have to be sealed. What to do...
I didn't want to use a whole bottle of glossy or matte accents on these wings (there were 20 images!), nor did I want to pile on clear embossing powder. I thought maybe spray fixative would work, but then I discovered I didn't have any on-hand. Doot doodle DOOOO! (yeah, cheesy music here) Hairspray! Yep, I sprayed 2 light coats of aerosol hairspray over the images, and voila! Sealed! It also adds a subtle sheen to the image.
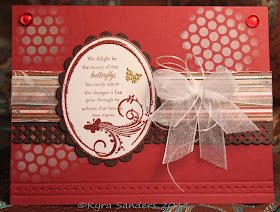
So there's your tip of the day. Aerosol - not pump sprayers, folks. Oh, and another sweet thing I'll share? See all the stitching on both cards? That's not real. Looks it, but it's not. Best of all? I can make it any color in the world and don't need to drag out my darling sewing machine. Yep, heat embossed Tim Holtz stitching stamp, then rub over it with a soft cloth to reduce the gloss.
Big news is coming soon for a new workshop from the ArtLab!! Happy experimenting, everyone!
♥ky
Pages
▼
Friday, July 22, 2011
Monday, July 11, 2011
Jack's Here!
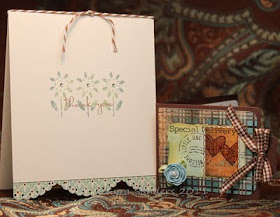
I made a set of cards for my cousin who just had her first baby, Jack. I also sent them a gift card, so I needed a folder for that. I know she will also need thank you cards. This is what I came up with:
This is the set she will receive - a dozen thank you cards and envelopes along with the gift card. The card image is from Stenciled Spring by Gina K. I know these will help her celebrate her beautiful son. Thanks so much for stopping by today - it means a lot to me!
Have a beautiful day!
♥ky
{click to enlarge}
This tabbed folder card from Stampin' Up was the perfect size to hold a gift card. I dressed it up with Basic Grey paper, and images from Tami Mayberry's Special Delivery set. I created the little blue flower (tutorial coming soon!) and added touches of ribbon and distress ink.{click to enlarge}
This is the set she will receive - a dozen thank you cards and envelopes along with the gift card. The card image is from Stenciled Spring by Gina K. I know these will help her celebrate her beautiful son. Thanks so much for stopping by today - it means a lot to me!
Have a beautiful day!
♥ky
Friday, July 1, 2011
Independence Weekend!
Wow - where has this year gone? I guess I shouldn't complain. It's July 1, and we haven't cracked 100 yet (or been too warm much at all). Here's a little something to stir your muse.
So, this set shows you how the same products, design and placements can dramatically alter a card. The card above was put together with no distressing, and no textural elements.
This card is the same with the addition of distressing to the horizontal patterned paper, and a different edging on the border. The ribbon treatment is a little less flamboyant as well.
Thanks so much for stopping by - I hope you have a great celebratory weekend (Independence and Canada Days). See you soon!
♥ky
{click to enlarge}
So, this set shows you how the same products, design and placements can dramatically alter a card. The card above was put together with no distressing, and no textural elements.
{click to enlarge}
This card is the same with the addition of distressing to the horizontal patterned paper, and a different edging on the border. The ribbon treatment is a little less flamboyant as well.
{click to enlarge}
This card returns the flamboyant ribbon, uses the distressed edges on the patterned paper, and adds a different textured border along with a little stencil work. I will be teaching these techniques in an at-your-own-pace, video class soon.Thanks so much for stopping by - I hope you have a great celebratory weekend (Independence and Canada Days). See you soon!
♥ky


